Today i will starting a post about layouting, the important part of “how to deploy my mockup into my application”.
At first we will start from understanding about Linear Layout, one of basic layouts in android.
Preparation
Let’s create new layout file. Go to res/layout folder then right-click on it. Choose New->XML->Layout XML File. Then insert file name.


After that you will get interface of this layout with display mode. You can change it to text mode to layouting with code. Just choose the display mode here

It will displaying xml code, but you still can see the preview by open the preview window here

Starting Code
Today we will play with layout only and no image or text appear here. As we can’t know if this layout is appear as we want without the content, we will use color as our guide. Add background code to layout properties
<LinearLayout xmlns:android="http://schemas.android.com/apk/res/android"
    android:layout_width="match_parent"
    android:layout_height="match_parent"
    android:background="#ed1c24">

</LinearLayout>

Now we know that our root Linear Layout is filling a whole area without having any content.
Lets start create some content with another Linear Layout. At first we will learn about width and height parameter. layout_width is param for size of the layout horizontaly (left to right) and layout_height is param for size of the layout vertically (top to bottom). The first sample we will use the number as the value.
<LinearLayout xmlns:android="http://schemas.android.com/apk/res/android"
    android:layout_width="match_parent"
    android:layout_height="match_parent"
    android:background="#ed1c24">
    <LinearLayout
        android:layout_width="200dp"
        android:layout_height="200dp"
        android:background="#00bff3"/>
</LinearLayout>

Your layout size is as big as the number you use. Based on google documentation
- dp: An abstract unit that is based on the physical density of the screen. Your 1 dp can become 1 or 2 pixels depend on device screen.
- px: Corresponds to actual pixels on the screen. Your 1 px will always be a 1 pixels in any device screen.
There are more than these 2 dimension used in android. Check dimension page from android documentation to see more. The next one, we will use pre-defined value for layout size. There are 3 types value you can use for your layout size.
- match_parent: means that the view wants to be as big as its parent, minus the parent’s padding, if any. Introduced in API Level 8.
- wrap_content: means that the view wants to be just large enough to fit its own internal content, taking its own padding into account.
- fill_parent: means that the view wants to be as big as its parent, minus the parent’s padding, if any. This value is deprecated starting in API Level 8 and replaced by
MATCH_PARENT.
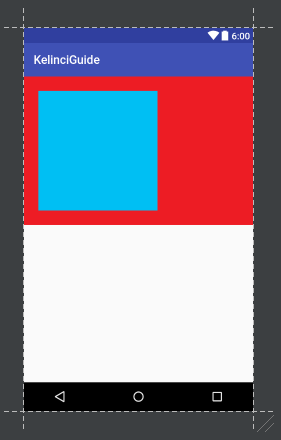
I will change the first Linear Layout param, check this code and see the effect of it
<LinearLayout xmlns:android="http://schemas.android.com/apk/res/android"
    android:layout_width="match_parent"
    android:layout_height="wrap_content"
    android:background="#ed1c24">
    <LinearLayout
        android:layout_width="200dp"
        android:layout_height="200dp"
        android:background="#00bff3"/>
</LinearLayout>

As you can see, the first Linear Layout (red) height as same as the second one (blue). The container will have height as same as total of its content size. This content including total (if have more than one) size of content + total margin size of the content + padding of the container. Check this sample below
<LinearLayout xmlns:android="http://schemas.android.com/apk/res/android"
    android:layout_width="match_parent"
    android:layout_height="wrap_content"
    android:background="#ed1c24">

    <LinearLayout
        android:layout_width="200dp"
        android:layout_height="200dp"
        android:layout_margin="24dp"
        android:background="#00bff3" />
</LinearLayout>
This is sample with adding margin to the content. The height of container (red) become larger.
<LinearLayout xmlns:android="http://schemas.android.com/apk/res/android"
    android:layout_width="match_parent"
    android:layout_height="wrap_content"
    android:padding="24dp"
    android:background="#ed1c24">

    <LinearLayout
        android:layout_width="200dp"
        android:layout_height="200dp"
        android:background="#00bff3" />
</LinearLayout>
This sample adding padding to the container and it become larger. It seems giving same result, but padding and margin have different function.
- Padding: Area inside of the box between the box wall (stroke, border, etc) and content. Adding padding make the box larger.
- Margin: Area outside of the box. Adding margin make the box shifting.
So which one you should use, depend on what you need despite giving “almost same” result. Check this css box model page to see position about padding and margin in box model.
Thats all for today post. Stay tune for my next basic tutorial.
Leave a Reply